AI Fake Chat Video Generator: Describe It, Get the Clip
Every fake chat video starts with the same job: writing the conversation and deciding when each bubble lands. The writing is the fun part. The timing, the typing indicators, the read marks and the pauses are the part that takes twenty minutes in an editor. An AI fake chat video generator does the second job for you, and MockClip's version does it from a single sentence.
This guide covers MockClip's Describe it mode: what it does, which templates it works on, how the AI turns a description into a playing clip, how to change one moment without rewriting everything, and what it costs. The demo below was written from the exact sentence the panel suggests as a placeholder.
What an AI fake chat video generator does
A fake chat video generator renders a scripted conversation as a video that looks like a screen recording of a messaging app. The classic workflow is manual: you add messages one by one, choose the sender, set a delay and a typing duration for each, decide which outgoing messages show ✓✓, and press play. MockClip's templates have worked that way since the start, and the Manual editor still does.
An AI generator removes the data entry. You describe the scene in plain words. The AI writes the whole clip: who the contact is, what each message says, which side sends it, how long the other person types before each reply, how long the read receipt waits, whether a reaction lands on the last message. The output is not a script you then have to enter. It is the finished clip, already loaded in the editor, already playing on the phone preview.
That is the difference between "AI writes the dialogue" and "AI writes the clip". Plenty of tools do the first. Describe it does the second, for every template on the site.
Which templates support Describe it
Describe it is the default view on every MockClip editor page, so the same panel works on all twelve templates:
- WhatsApp — one-to-one chats with typing, ✓, ✓✓ and reactions
- iMessage — blue and grey bubbles, Delivered and Read, tapbacks
- Telegram — reply quotes, image attachments with a file name and size, the chats list flow
- Instagram DM — Seen states and reactions
- ChatGPT — a user prompt, a thinking or searching indicator, and the streamed answer
- Reddit — a post with nested comments, votes and flair
- Tinder — a stack of profiles, swipes left and right, a match
- Phone call — an incoming call that rings, gets accepted or declined, connects and ends
- Phone call notification — the banner version of the same call
- iMessage notification — a stack of lock-screen text banners
The AI knows the fields of the template you are on. Ask the Telegram template for "a reply quote at the turn" and you get a quote block. Ask the Tinder template for "three profiles, the middle one is a catfish" and you get three profiles with bios and swipe directions. Ask the phone call template for "a call from 'Boss' at 11pm that goes unanswered" and you get a ringing screen that nobody picks up.
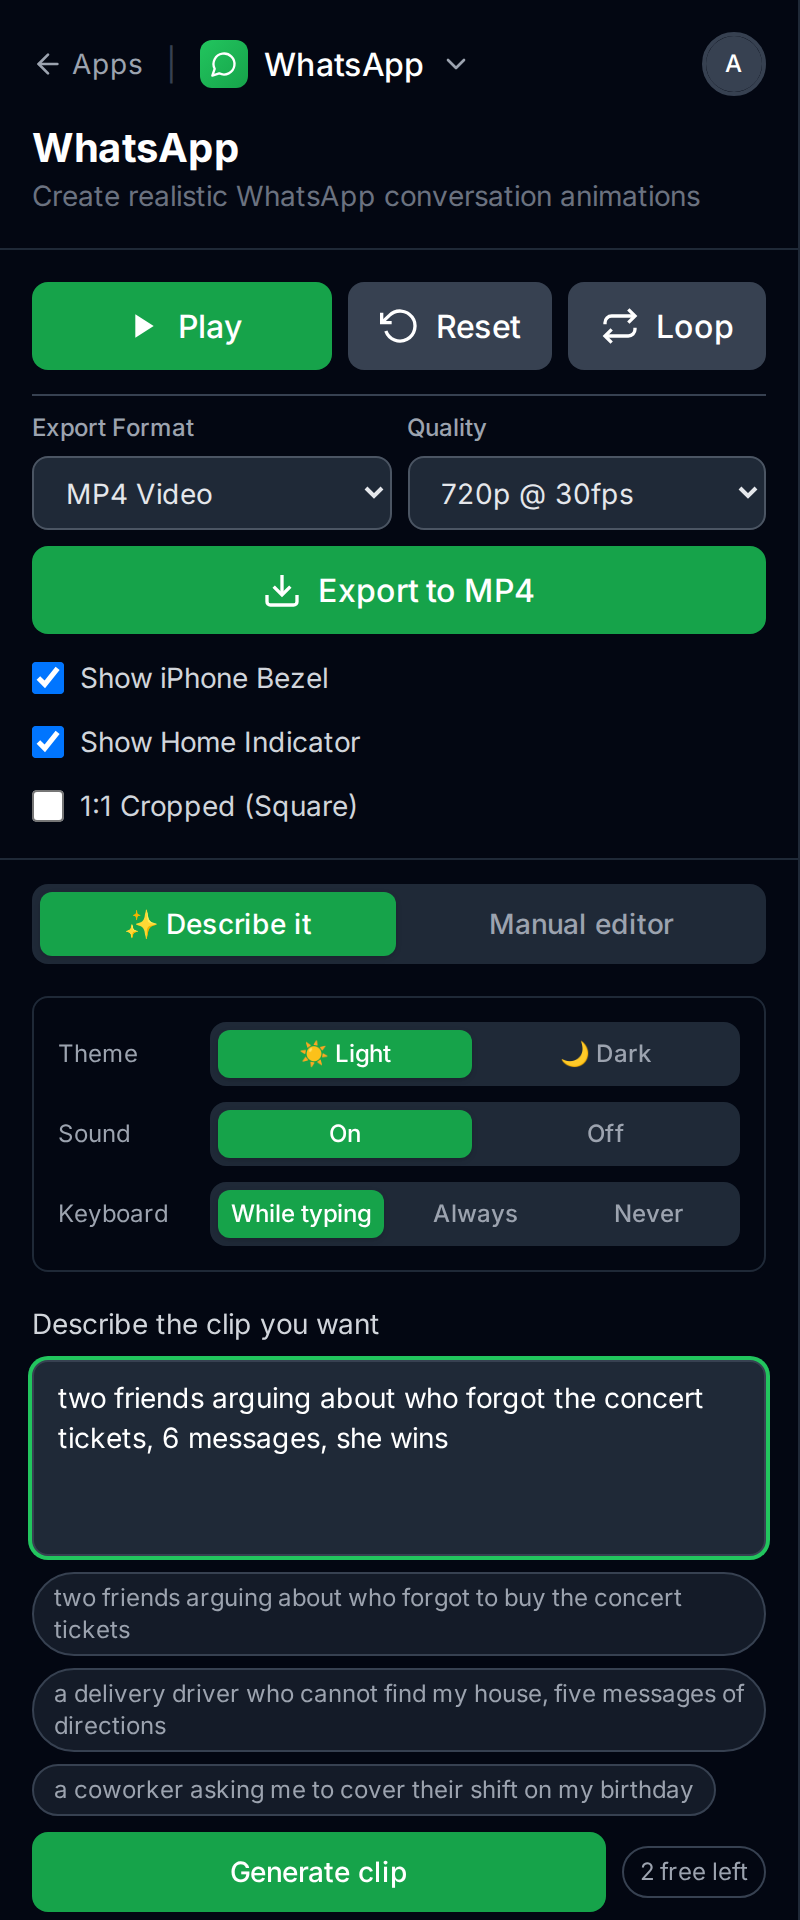
How a description becomes a clip
Open any template. Above the editor column sits a small switch: ✨ Describe it or Manual editor. Describe it is selected by default, and the browser remembers whichever you used last.
The panel has one box, labelled Describe the clip you want. Under it are three example chips specific to the template, written in the same voice the AI responds well to. On WhatsApp they read "two friends arguing about who forgot to buy the concert tickets", "a delivery driver who cannot find my house, five messages of directions" and "a coworker asking me to cover their shift on my birthday". Click one to load it, or type your own. A description can be anywhere from three to 1,500 characters.
Press Generate clip (or ⌘/Ctrl + Enter). MockClip sends the description and the template's format to an OpenAI model, which answers with the clip in the template's own structure. MockClip validates the answer against the template rules, loads it into the editor, and starts playback from 0:00. On a normal request the preview is playing within about twenty seconds.
What the AI decides for you:
- The cast. A contact name and status ("Marta", "online"), or a subreddit and a username, or a caller name, depending on the template.
- The lines. Four to ten messages by default, each under 200 characters, in the tone you asked for. Say "6 messages" and you get six. Say "she wins" and the last word is hers.
- The pacing. A typing duration for every incoming message, a delay before every outgoing one, and a total length that lands between roughly twelve and thirty-five seconds unless you ask for something else.
- The details. Timestamps on bubbles, ✓✓ read marks with their own delay, a reaction on the line that deserves one, a thinking indicator before a ChatGPT answer.
What the AI does not decide: pictures. It never invents an image link. If you want a photo in a bubble, paste an http or https URL to one in your description and the AI places it. Otherwise the image fields stay empty, which is the right default for a clip that should look like a real chat.
Theme, sound, keyboard and background
Between the mode switch and the description box sits a small appearance strip. It holds the settings people most often want to set before or after generating, without opening the Manual editor:
- Theme — ☀️ Light or 🌙 Dark.
- Sound — On or Off, for the typing clicks, send sounds and notification chimes.
- Keyboard — on the chat templates: show the on-screen keyboard While typing, Always, or Never.
- Background — on the iMessage notification and phone call notification templates: Default, Transparent or Chroma key, with a colour picker for the chroma colour.
Whatever you set here sticks. The AI's next generation, a refine or an undo cannot silently switch your dark theme back to light, because the strip's choices are laid over every clip the AI hands back. Settings you never touch stay with the AI, so "make it dark mode" in a description still works.
The Transparent background is what makes a notification overlay: exported as a MOV or WebM, only the banner is drawn and everything around it is see-through. The transparent notification video guide covers that workflow.
The "what happens when" list and the time badge
Once a clip is loaded, the panel shows a numbered list called What happens when. Each row is one beat of the clip with its start and end second, the sender, the text and a hint about what is happening:
0:01–0:02  #1 Marta: so… tickets? (typing 1.5s)
0:03–0:07  #2 Me: you said you'd get them (typed in, read ✓✓)
0:07–0:09  #3 Marta: I said I'd LOOK. You said "leave it with me" 😅 (typing 2.2s)
0:10–0:15  #4 Me: the show is in 3 hours (typed in, read ✓✓)
The row that is playing right now lights up, and a small badge in the corner of the phone preview shows the current second, for example 0:04.9 / 0:25. Together they answer the question every editor makes you guess at: which second is which message.
The list is also how you talk back to the AI.
Refine by the second
Under the description box, once a clip exists, a second box appears: Change something — say the second. Its placeholder is the whole idea in one line: "at 0:04 make her reply angrier · add a message after 0:07 · make it 5 seconds shorter".
You point at a moment, you say what should be different, you press Apply change. MockClip sends the AI the current clip together with the second-by-second list, so the model sees exactly what is at 0:04 and changes only that. Everything else stays identical, down to the typing durations. A few refinements that work well:
- "at 0:09 make her reply angrier" — rewrites one message, keeps its timing
- "add a message after 0:15 where he apologises" — inserts a beat and shifts the rest
- "make the pause before 0:10 longer, he's thinking" — changes one delay
- "make it 5 seconds shorter" — trims the clip without cutting the story
- "swap the names, she's Ana and he's Rui" — a cast change across every message
Undo takes you back one version, up to ten versions deep, so an experiment costs nothing. Start over clears the panel for a new description. Each refinement is a generation, the same as a fresh clip, so it counts against the allowance described below.
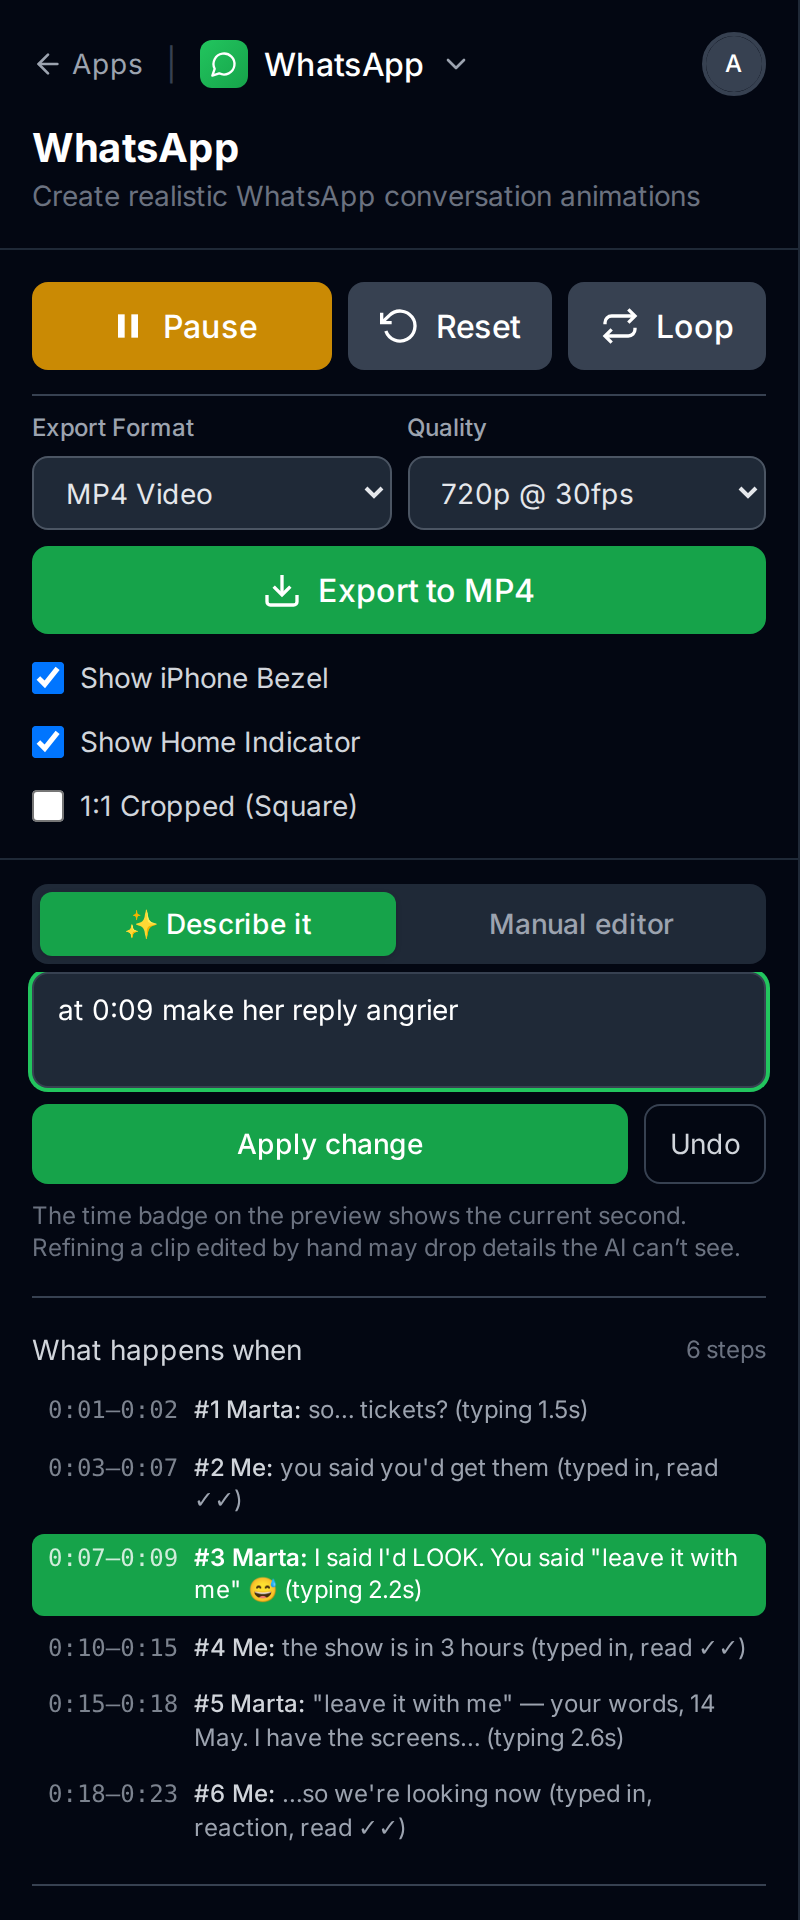
One caveat, printed under the box: refining a clip you have edited by hand may drop details the AI cannot see. The AI works from the template's shared structure; a base64 image you uploaded in the manual editor is not part of that structure, so a refinement will not carry it. Do your AI passes first, your manual passes last.
Describe it, the Manual editor, or the MCP server
MockClip now has three ways to build the same clip, and they are meant to be combined rather than chosen between.
Describe it is for getting from an idea to a playing clip fast, and for changing one moment without touching the rest. It is the right starting point for almost everyone.
The Manual editor is the per-template form that existed before: every message, delay, typing speed, read-mark delay and theme as a field. A generated clip is an ordinary config, so Fine-tune in the manual editor → at the bottom of the panel opens the exact clip the AI wrote, ready for surgery. Use it when the AI got the story right and you want to nudge a single delay by half a second, or set a specific timestamp on a bubble.
The MCP server is the developer route. From Claude, ChatGPT or any MCP-compatible client, a create_whatsapp_conversation call returns a link that opens the finished clip in MockClip. It uses the same clip language as Describe it, so a clip made either way can be refined or edited the same way afterwards. The guide to connecting MockClip to Claude or ChatGPT covers the setup. If you are not scripting clips from your own AI client, you do not need it; Describe it is the same capability without the setup.
Allowances and AI credits
Generating a clip requires a sign-in with Google or GitHub. A signed-out visitor sees Sign in to generate (2 free), and the description typed before the sign-in survives the round trip.
- Free accounts get two generations for life. That is enough to see what the mode does with your own idea, refine it once, and export the result with the MockClip watermark.
- Pro is a €10 one-time payment, not a subscription. It removes the watermark from every export and adds five AI generations every month, resetting on the first of the month.
- AI credits come in a €5 pack of 50. One credit is one generation, on either plan. On the free plan a credit can also buy one export without the watermark, which is the cheapest way to get a clean file for a single video. Credits never expire.
Generations are used in a fixed order: the Pro monthly five first, then the free two, then credits. If a generation fails on the AI side, it is refunded. When you run out, the panel says "You've used your free generations." and offers the pack or Pro; the chip next to the Generate button ("2 free left", "4 left this month · 12 credits") tells you where you stand before you press anything. The pricing page has the full comparison, and prices exclude VAT.
Exporting the result
The export controls are the same in both modes, because they sit above the Describe it and Manual editor tabs and belong to the page rather than the clip. Pick the format, the quality and the frame, and press export. The file renders in your browser and downloads directly; nothing is uploaded.
- Export Format — MP4 Video for social posts, GIF Animation for articles and chats, or MOV · ProRes 4444 (transparent) and WebM · VP9 (transparent) for overlays with an alpha channel.
- Quality — 720p or Full HD, at 15, 24, 30 or 60 fps.
- Frame — vertical 9:16 by default, which drops into TikTok, Instagram Reels and YouTube Shorts without cropping. Tick 1:1 Cropped (Square) for a square that keeps the typing and keyboard in shot, or untick Show iPhone Bezel for the bare app screen in 9:16, iPhone, 3:2 or 1:1.
On a phone, the same options sit in a collapsible Frame & export section at the top of the editor. The square chat video guide covers the 1:1 layouts, and the export settings guide covers every format and size.
Free exports carry a small MockClip watermark. Pro exports do not. A free account with credits sees an Export without watermark (1 credit) option next to the export button, which spends one credit for that single file.
Free to start. Sign in with Google or GitHub. Two generations included.
Try Describe it on WhatsAppWriting descriptions the AI does well with
The example chips are the best guide to the voice: short, concrete, with a twist. A few patterns that reliably produce a good first draft:
- Name the sides. "my mom" and "me", "a landlord" and "a tenant", "a brand" and "an influencer". The AI picks a contact name and status that fit.
- State the count. "6 messages" or "a quick 4-message exchange". Without a number you get four to ten.
- Give it a turn. "it escalates", "she wins", "the last reply flips the story", "he leaves it on read". The turn is what makes the clip worth watching, and the AI builds the pacing around it.
- Set the tone in one word. "brutally honest", "passive-aggressive", "overly polite".
- Mention a template feature if you want it. "with a reply quote on the last message" on Telegram, "a laugh reaction on her final line" on WhatsApp, "a thinking step before the answer" on ChatGPT.
For a bank of ready-to-paste prompts by template, see AI chat video prompt ideas for TikTok, Reels and Shorts. For the full step-by-step, including the sign-in and export screens, see how to make a fake text conversation video with AI prompts.
Common mistakes and how to avoid them
- Asking for a photo. The AI will not invent one. Paste a link, or add the image later in the manual editor.
- Asking for a duration with a number field in mind. There is no slider. Say it: "about 15 seconds", "make it 5 seconds shorter".
- Writing a paragraph of backstory. The model does not need the characters' history, it needs the scene. One or two sentences beat ten.
- Refining after heavy manual edits. Do the AI passes first; manual tweaks last.
- Regenerating from scratch to fix one line. That is what the refine box is for, and it costs the same one generation while keeping everything you liked.
- Expecting group chats, stickers or voice notes. No template renders them, so no description will produce them. Write the story around what the template does; the fake chat video maker guide lists each template's features.
How this compares to other AI chat video tools
Most tools in this space are one of two things: a text generator that hands you dialogue to paste into something else, or a video editor with a chat-bubble overlay you still animate by hand. The MockClip vs CapCut and MockClip vs Crayo AI comparisons go into the detail. Describe it sits in the gap: the AI writes the clip in the template's real structure, the template renders the real interface (header, bubbles, read marks, typing, phone frame), and the refinement loop works by second rather than by re-prompting from zero. The manual editor and the MCP server remain for the cases where you want every field or want to script clips from your own tools.
Quick start checklist
- Open a template, for example WhatsApp. Describe it is already selected.
- Click an example chip or type a sentence: who, about what, how many messages, who wins.
- Press Generate clip and sign in with Google or GitHub if asked.
- Watch the preview; read the What happens when list to see which second is which message.
- Refine by the second: "at 0:09 make her reply angrier". Undo if you preferred the old one.
- Optionally open Fine-tune in the manual editor → for a last pass.
- Export MP4 or GIF. Free exports carry the watermark; Pro or a credit removes it.
Related MockClip templates and guides
- WhatsApp chat maker — the template used in the demo
- iMessage conversation maker — the US-style equivalent
- ChatGPT conversation maker — describe a prompt and the streamed answer
- How to make a fake text conversation video with AI prompts — the step-by-step tutorial
- AI chat video prompt ideas for TikTok, Reels and Shorts — 30+ prompts by template
- Connect MockClip to Claude or ChatGPT — the MCP route for developers
- How to go viral with fake conversation videos — what to do with the clip once you have it
- Pricing — free, Pro and AI credits
Frequently Asked Questions
What is an AI fake chat video generator?
An AI fake chat video generator turns a written description into an animated conversation that looks like a screen recording of a messaging app. In MockClip you type what should happen, the AI writes every message, name and pause as a clip for the template you picked, and the phone preview plays it. You then export it as an MP4, a GIF, or a transparent MOV or WebM, in vertical or 1:1 square.
Which apps does MockClip's Describe it mode work on?
All twelve templates: ChatGPT, iMessage, iMessage notification, WhatsApp, Telegram, Messenger, Discord, Instagram DM, Tinder, Reddit, phone call and phone call notification. The Describe it panel is the default view on every /app page, and the Manual editor is one click away.
Do I need an account to use the AI generator?
Yes. Generating a clip needs a sign-in with Google or GitHub. Free accounts include two generations. Anything you typed before signing in is kept, so you do not lose the description.
How do I change one part of a generated clip?
Use the second box in the panel, Change something — say the second. Point at the moment using the time badge over the preview, for example 'at 0:04 make her reply angrier' or 'add a message after 0:07'. The AI changes only that part. Undo takes you back to the previous version.
Can the AI add pictures, voice notes or stickers?
No. The AI never invents images. It uses an image only if you paste an http or https link to one in your description. Voice notes and stickers are not part of any template. The text, the names, the timing, the typing indicators, the read marks and the reactions are all written by the AI.
How much does the AI mode cost?
Free accounts get two generations for life. Pro, a €10 one-time payment, adds five generations every month and removes the watermark from exports. Beyond that, a €5 pack of 50 credits covers extra generations on either plan, and credits never expire. Prices exclude VAT.
Is a generated clip editable by hand?
Yes. The AI writes an ordinary MockClip config. Switch to the Manual editor and every field is there: message text, sender, delays, typing durations, read marks, theme. You can also keep refining with the AI, undo, or start over.
Related Articles
How to Make a Fake Text Conversation Video With AI Prompts
Type one sentence and get a fake text conversation video. MockClip's Describe it mode writes the messages and timing; you edit by the second and export MP4.
AI Chat Video Prompt Ideas for TikTok, Reels and Shorts
30+ ready-to-paste prompts for MockClip's Describe it mode: WhatsApp, iMessage, Telegram, ChatGPT, Reddit, Tinder and more. One sentence in, a chat video out.
How to Connect MockClip to Claude and ChatGPT (MCP Setup Guide)
Step-by-step guide to configure MockClip inside Claude Desktop and ChatGPT using the Model Context Protocol. Generate conversation mockup videos from plain-English prompts.
Fake Chat Video Maker Free: Create Text Conversation Videos
Free fake chat video maker for TikTok and Reels. Create realistic animated text conversations with iMessage, WhatsApp, and Instagram DM interfaces in minutes.
Fake Chat Video Export Settings: MP4, GIF, MOV, WebM, 1:1
Every MockClip export setting explained: MP4, GIF, transparent MOV and WebM, 720p and Full HD, 1:1 square, bezel-less frames, watermark, mobile and links.